Printing Materials
Each printed page includes a line of text at the top indicating you as the printer of the material. Pages you print are for your personal use only.
Browsers and Print Quality
Since the Miami UBook (Unizin Engage platform) uses the browser's print functionality to print the course material, differences in how browsers set print margins will affect your printed version of the course material. These differences may cause problems such as:
- Your print job might print on more pages than you intended
- Pages may print very small, making the printed text difficult to read
- Pages may be shifted and "break" from one page to the next
- When pages break across pages, some text may be obscured by the page break or missing entirely
The lists below indicate the best browsers to use based on our testing. Google Chrome provides the best printing results by default, and is also the only browser that allows you to adjust the print margins easily. If you have problems with your printed pages, see the Adjusting Margins in Google Chrome section below for troubleshooting steps.
- PC operating systems
- Google Chrome (best)
- Mozilla Firefox
- Microsoft Internet Explorer
- Macintosh operating systems
- Google Chrome (best)
- Mozilla Firefox
- Apple Safari
Printing to Your Printer
Use the following steps to print pages from a Miami UBook textbook or other course material:
- Open the course material from which you would like to print.
- Click the Page Options menu in the upper-right corner of the screen.
- Select the Print The Print window appears.
- Type the beginning and ending pages numbers you would like to print, separated by a hyphen. For example, if you enter 25-28, the system prints pages 25, 26, 27, and 28.
- Click Print. Engage will generate a file of pages that can be printed. (This may take several moments. When ready, a confirmation window appears.)
- Once generated, click Printin your computer's print dialog.
Adjusting Margins in Google Chrome
Use the following steps to correct printing problems by adjusting the print margins of your document. You must complete these steps while using the Google Chrome browser.
- Complete steps 1-5 of the Printing to Your Printer procedure in Google Chrome.
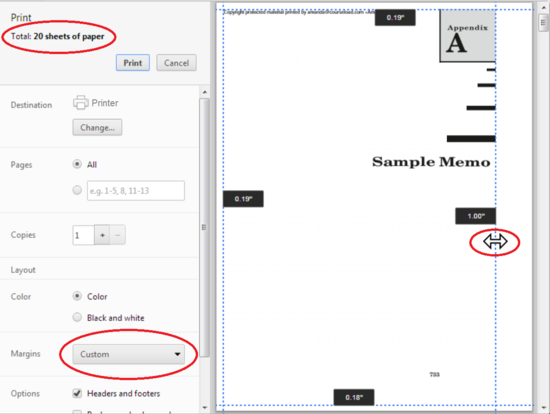
A print preview window appears. See example image below. - Select the printer you want to use from the Destination drop-down.
- Check the Totalsheets of paper that the preview is set to print (highlighted in the image below). If the number is greater than you expected, proceed with the following steps.
- Choose Customfrom the Margins drop-down list (highlighted in the image below).
A blue dotted line appears around the margins of the page preview. - Click the blue dotted line on the right side of the page (highlighted in the image below) and drag it slightly inward. Repeat until the Total sheets of paper equals the number of pages you expected to print.
- Click Print.