

Tech Support
Computing in a language other than English presents its own set of challenges. This section presents various general solutions and recommendations for users of Macintosh and Windows who work with various languages.
Please note that the help guides listed here are for languages that Miami currently teaches. If you have questions about setting up a language keyboard for a language that Miami does not currently teach, please contact the ILRC Director, Daniel Meyers, and he will assist you in getting your specific language set up.
Windows Language Keyboard Configurations
For some Latin-based languages, such as French, German, Italian, Portuguese, and Spanish, you may have an easier time with diacritical character input by using the US International keyboard layout You might decide to choose to use this layout over memorizing the individual ANSI codes for each character.
These instructions assume that you have already set up the US International Keyboard.
How the US International Keyboard Works
First, certain keys become "prefix" or "dead" keys.

| ' | single quote key | acute |
| " | double quote key (Shift-') | umlaut |
| ` | grave key | grave |
| ^ | caret (Shift-6) | circumflex |
| ~ | tilde (Shift-grave) | tilde |
This may be confusing at first, because nothing is visible on screen after the first key press. The combination character is not displayed until the second key is pressed to complete the sequence.
If the next character does not take an accent mark, then the prefix sequence is aborted and two consecutive ordinary characters are obtained. For example: since there is no letter p with a tilde ~ on top, the key sequence ~ p will produce the separate characters ~p.
Second, the behavior of the right-hand "Alt" key is modified. Hold the Right Alt key and press other letter or number keys to obtain a wide variety of other letters and accents. Some of them are duplicates of the "prefix" combinations, others are new.

French Character Entry
| DESCRIPTION | EXAMPLE | KEY COMBINATION |
|---|---|---|
| Acute | á Á |
' + a ' + Shift-A |
| é É |
' + e ' + Shift-E |
|
| í Í |
' + i ' + Shift-I |
|
| ó Ó |
' + o ' + Shift-O |
|
| ú Ú |
' + u ' + Shift-U |
|
| Ash | æ Æ |
Alt-Gr + z Alt-Gr + Shift-Z |
| Cedilla | ç Ç |
Alt-Gr + , (comma) Alt-Gr + < (shift-comma) |
| Circumflex | â Â |
^ (Shift-6) + a ^ (Shift-6) + Shift-A |
| ê Ê |
^ (Shift-6) + e ^ (Shift-6) + Shift-E |
|
| î Î |
^ (Shift-6) + i ^ (Shift-6) + Shift-I |
|
| ô Ô |
^ (Shift-6) +o ^ (Shift-6) +Shift-O |
|
| û Û |
^ (Shift-6) + u ^ (Shift-6) + Shift-U |
|
| French/Spanish Quotes | « » |
Alt-Gr + [ Alt-Gr + ] |
| Grave | à À |
` + a ` + Shift-A |
| è È |
` + e ` + Shift-E |
|
| ì Ì |
` + i ` + Shift-I |
|
| ò Ò |
` + o ` + Shift-O |
|
| ù Ù |
` + u ` + Shift-U |
|
| Oethel | œ Œ |
Not Available On This Keyboard |
| Umlaut | ë Ë |
" + e " + Shift-E |
| ï Ï |
" + i " + Shift-I |
|
| ü Ü |
" + u " + Shift-U |
|
| ÿ Ÿ |
" + y Not Available On This Keyboard |
If you are plagued by strangeness such as cést when you try to type c'est, re-read the note above.
German Character Entry
| DESCRIPTION | EXAMPLE | KEY COMBINATION |
|---|---|---|
| Umlaut | ä Ä |
" + a " + Shift-A |
| ö Ö |
" + o " + Shift-O |
|
| ü Ü |
" + u " + Shift-U |
|
| Sharp-S | ß | ALT-Gr + s |
Note: Press space if you wanted " (double quotes). So you need to press Shift + " and then space to get a single double quote in International US keyboard.
Italian Character Entry
| DESCRIPTION | EXAMPLE | KEY COMBINATION |
|---|---|---|
| Acute | á Á |
' + a ' + Shift-A |
| é É |
' + e ' + Shift-E |
|
| í Í |
' + i ' + Shift-I |
|
| ó Ó |
' + o ' + Shift-O |
|
| ú Ú |
' + u ' + Shift-U |
|
| Grave | à À |
` + a ` + Shift-A |
| è È |
` + e ` + Shift-E |
|
| ì Ì |
` + i ` + Shift-I |
|
| ò Ò |
` + o ` + Shift-O |
|
| ù Ù |
` + u ` + Shift-U |
|
| Umlaut | ï Ï |
" + u " + Shift-U |
Latin Character Entry
| DESCRIPTION | EXAMPLE | KEY COMBINATION |
|---|---|---|
| Breve | ă Ă |
Alt-Gr + b , then a Alt-Gr + b, then Shift-a |
| ĕ Ĕ |
Alt-Gr + b, then e Alt-Gr + b, then Shift-e |
|
| ĭ Ĭ |
Alt-Gr + b, then i Alt-Gr + b, then Shift-i |
|
| ŏ Ŏ |
Alt-Gr + b, then o Alt-Gr + b, then Shift-o |
|
| ŭ Ŭ |
Alt-Gr + b, then u Alt-Gr + b, then Shift-u |
|
| y̆ Y̆ |
Alt-Gr + b, then y Alt-Gr + b, then Shift-y |
|
| Macron | ā Ā |
Alt-Gr + a , then a Alt-Gr + a, then Shift-a |
| ē Ē |
Alt-Gr + a, then e Alt-Gr + a, then Shift-e |
|
| ī Ī |
Alt-Gr + a, then i Alt-Gr + a, then Shift-i |
|
| ō Ō |
Alt-Gr + a, then o Alt-Gr + a, then Shift-o |
|
| ū Ū |
Alt-Gr + a, then u Alt-Gr + a, then Shift-u |
|
| ȳ Ȳ |
Alt-Gr + a, then y Alt-Gr + a, then Shift-y |
|
| Ash | æ Æ |
Alt-Gr + z Alt-Gr + Shift-Z |
| Oethel | œ Œ |
Not Available On This Keyboard |
Portuguese Character Entry
| DESCRIPTION | EXAMPLE | KEY COMBINATION |
|---|---|---|
| Acute | á Á |
' + a ' + Shift-A |
| é É |
' + e ' + Shift-E |
|
| í Í |
' + i ' + Shift-I |
|
| ó Ó |
' + o ' + Shift-O |
|
| ú Ú |
' + u ' + Shift-U |
|
| Cedilla | ç | Alt-Gr + , (comma) |
| Circumflex | â Â |
^ (Shift-6) + a ^ (Shift-6) + Shift-A |
| ê Ê |
^ (Shift-6) + e ^ (Shift-6) + Shift-E |
|
| ô Ô |
^ (Shift-6) + o ^ (Shift-6) + Shift-O |
|
| Grave | à À |
` + a ` + Shift-A |
| è È |
` + e ` + Shift-E |
|
| ì Ì |
` + i ` + Shift-I |
|
| ò Ò |
` + o ` + Shift-O |
|
| ù Ù |
` + u ` + Shift-U |
|
| Tilde | ã Ã |
˜ (Shift+`) + a ˜ (Shift+`) + Shift-A |
| õ Õ |
˜ (Shift+`) + o ˜ (Shift+`) + Shift-O |
Spanish Character Entry
| DESCRIPTION | EXAMPLE | KEY COMBINATION |
|---|---|---|
| Acute | á Á |
' + a ' + Shift-A |
| é É |
' + e ' + Shift-E |
|
| í Í |
' + i ' + Shift-I |
|
| ó Ó |
' + o ' + Shift-O |
|
| ú Ú |
' + u ' + Shift-U |
|
| Tilde | ñ Ñ |
(Shift+`) + n ˜ (Shift+`) + Shift-N |
| Umlaut | ü Ü |
" + u " + Shift-U |
| French/Spanish Quotes | « » |
Alt-Gr + [ Alt-Gr + ] |
| Inverted Exclamation Mark | ¡ | Alt-Gr + 1 |
| Inverted Question Mark | ¿ | Alt-Gr + / |
- Click the Start menu and select Settings.

- Select the Time and Language tab on the left-hand side of the settiings window.
- Click on Language & Region bar.

- Under the "Language" section, under the "Preferred Languages" setting, click the [...] next to English (United States).
- A sub-menu will appear. Click ... Language Options.

- Under "Keyboards," select the Add a Keyboard button.
- Scroll through the keyboard options until you see United States - International and select that keyboard option.

- The United States - International keyboard layout should be added to your list of active keyboards.
- Close out of the Settings panel.
- In the lower right-hand corner of your desktop, you will see “ENG” for your keyboard selection. Click “ENG” and select ENG-INTL for your keyboard.

Though several programs have unique key mappings, the following code key combinations (known as ALT code entry) should work for any program installed under the Windows platform.

To enter ALT codes, be sure your Number Lock key is pressed for your numeric keypad. Press the ALT key and hold it while typing the number combination on the numeric keypad to the right of the keyboard.
Simple Diacriticals
|
DESCRIPTION |
LOWERCASE EXAMPLE |
KEY COMBINATION |
UPPERCASE EXAMPLE |
KEY COMBINATION |
|---|---|---|---|---|
|
Acute |
á |
ALT + 0225 |
Á |
ALT + 0193 |
|
é |
ALT + 0233 |
É |
ALT + 0201 |
|
|
í |
ALT + 0237 |
Í |
ALT + 0205 |
|
|
ó |
ALT + 0243 |
Ó |
ALT + 0211 |
|
|
ú |
ALT + 0250 |
Ú |
ALT + 0218 |
|
|
Ý |
ALT + 0253 |
Ý |
ALT + 0221 |
|
|
ć |
ALT + 0263 |
Ć |
ALT + 0262 |
|
|
ǵ |
ALT + 501 |
Ǵ |
ALT + 500 |
|
|
ḱ |
ALT + 7729 |
Ḱ |
ALT + 7728 |
|
|
ĺ |
ALT + 0314 |
Ĺ |
ALT + 0313 |
|
|
ḿ |
ALT + 7743 |
Ḿ |
ALT + 7742 |
|
|
ń |
ALT + 0324 |
Ń |
ALT + 0323 |
|
|
ṕ |
ALT + 7765 |
Ṕ |
ALT + 7764 |
|
|
ŕ |
ALT + 0341 |
Ŕ |
ALT + 0340 |
|
|
ś |
ALT + 0347 |
Ś |
ALT + 0346 |
|
|
ẃ |
ALT + 7811 |
Ẃ |
ALT + 7810 |
|
|
ź |
ALT + 0378 |
Ć |
ALT + 0262 |
|
|
Acute Double |
ő |
ALT + 0337 |
Ő |
ALT + 0336 |
|
ű |
ALT + 0369 |
Ű |
ALT + 0368 |
|
|
Arch (Inverted Breve) |
ȃ |
ALT + 515 |
Ȃ |
ALT + 514 |
|
ȇ |
ALT + 519 |
Ȇ |
ALT + 518 |
|
|
ȋ |
ALT + 523 |
Ȋ |
ALT + 522 |
|
|
ȏ |
ALT + 527 |
Ȏ |
ALT + 526 |
|
|
ȗ |
ALT + 535 |
Ȗ |
ALT + 534 |
|
|
ȓ |
ALT + 531 |
Ȓ |
ALT + 530 |
|
|
Ash |
æ |
ALT + 0230 |
Æ |
ALT + 0198 |
|
Breve |
ă |
ALT + 0259 |
Ă |
ALT + 0258 |
|
ĕ |
ALT + 0277 |
Ĕ |
ALT + 0276 |
|
|
ĭ |
ALT + 0301 |
Ĭ |
ALT + 0300 |
|
|
ŏ |
ALT + 0335 |
Ŏ |
ALT + 0334 |
|
|
ŭ |
ALT + 0365 |
Ŭ |
ALT + 0364 |
|
|
ğ |
ALT + 0287 |
Ğ |
ALT + 0286 |
|
|
Breve Below |
ḫ |
ALT + 7723 |
Ḫ |
ALT + 7722 |
|
Caron (Hachek) |
ǎ |
ALT + 462 |
Ǎ |
ALT + 461 |
|
ě |
ALT + 0283 |
Ě |
ALT + 0282 |
|
|
ǐ |
ALT + 464 |
Ǐ |
ALT + 463 |
|
|
ǒ |
ALT + 466 |
Ǒ |
ALT + 465 |
|
|
ǔ |
ALT + 468 |
Ǔ |
ALT + 467 |
|
|
č |
ALT + 0269 |
Č |
ALT + 0268 |
|
|
ď |
ALT + 0271 |
Ď |
ALT + 0270 |
|
|
ǧ |
ALT + 487 |
Ǧ |
ALT + 486 |
|
|
ȟ |
ALT + 543 |
Ȟ |
ALT + 542 |
|
|
ǩ |
ALT + 489 |
Ǩ |
ALT + 488 |
|
|
ľ |
ALT + 0318 |
Ľ |
ALT + 0317 |
|
|
ň |
ALT + 0328 |
Ň |
ALT + 0327 |
|
|
ř |
ALT + 0345 |
Ř |
ALT + 0344 |
|
|
š |
ALT + 0353 |
Š |
ALT + 0352 |
|
|
ť |
ALT + 0357 |
Ť |
ALT + 0356 |
|
|
ž |
ALT + 0382 |
Ž |
ALT + 0381 |
|
|
Cedilla |
ç |
ALT + 0231 |
Ç |
ALT + 0199 |
|
ḑ |
ALT + 7697 |
Ḑ |
ALT + 7696 |
|
|
ȩ |
ALT + 553 |
Ȩ |
ALT + 552 |
|
|
ģ |
ALT + 0291 |
Ģ |
ALT + 0290 |
|
|
ḩ |
ALT + 7721 |
Ḩ |
ALT + 7720 |
|
|
ķ |
ALT + 0311 |
Ķ |
ALT + 0310 |
|
|
ļ |
ALT + 0316 |
Ļ |
ALT + 0315 |
|
|
ņ |
ALT + 0326 |
Ņ |
ALT + 0325 |
|
|
ŗ |
ALT + 0343 |
Ŗ |
ALT + 0342 |
|
|
ş |
ALT + 0351 |
Ş |
ALT + 0350 |
|
|
ţ |
ALT + 0355 |
Ţ |
ALT + 0354 |
|
|
Circumflex |
â |
ALT + 0226 |
 |
ALT + 0194 |
|
ê |
ALT + 0234 |
Ê |
ALT + 0202 |
|
|
î |
ALT + 0238 |
Î |
ALT + 0206 |
|
|
ô |
ALT + 0244 |
Ô |
ALT + 0212 |
|
|
û |
ALT + 0251 |
Û |
ALT + 0219 |
|
|
ĉ |
ALT + 0265 |
Ĉ |
ALT + 0264 |
|
|
ĝ |
ALT + 0285 |
Ĝ |
ALT + 0284 |
|
|
ĥ |
ALT + 0293 |
Ĥ |
ALT + 0292 |
|
|
ĵ |
ALT + 0309 |
Ĵ |
ALT + 0308 |
|
|
ŝ |
ALT + 0349 |
Ŝ |
ALT + 0348 |
|
|
ŵ |
ALT + 0373 |
Ŵ |
ALT + 0372 |
|
|
ŷ |
ALT + 0375 |
Ŷ |
ALT + 0374 |
|
|
ẑ |
ALT + 7825 |
Ẑ |
ALT + 7824 |
|
|
Circumflex Below |
ḙ |
ALT + 7705 |
Ḙ |
ALT + 7704 |
|
ṷ |
ALT + 7799 |
Ṷ |
ALT + 7798 |
|
|
ḓ |
ALT + 7699 |
Ḓ |
ALT + 7698 |
|
|
ḽ |
ALT + 7741 |
Ḽ |
ALT + 7740 |
|
|
ṋ |
ALT + 7755 |
Ṋ |
ALT + 7754 |
|
|
ṱ |
ALT + 7793 |
Ṱ |
ALT + 7792 |
|
|
Comma |
ș |
ALT + 537 |
Ș |
ALT + 536 |
|
ț |
ALT + 539 |
Ț |
ALT + 538 |
|
|
Descender |
ⱨ |
ALT + 11368 |
Ⱨ |
ALT + 11367 |
|
ⱪ |
ALT + 11370 |
Ⱪ |
ALT + 11369 |
|
|
ⱬ |
ALT + 11372 |
Ⱬ |
ALT + 11371 |
|
|
Diaresis |
ḧ |
ALT + 7719 |
Ḧ |
ALT + 7718 |
|
ẅ |
ALT + 7813 |
Ẅ |
ALT + 7812 |
|
|
ẍ |
ALT + 7821 |
Ẍ |
ALT + 7820 |
|
|
Diaresis Below |
ṳ |
ALT + 7795 |
Ṳ |
ALT + 7794 |
|
Dot |
ȧ |
ALT + 551 |
Ȧ |
ALT + 550 |
|
ė |
ALT + 0279 |
Ė |
ALT + 0278 |
|
|
ȯ |
ALT + 559 |
Ȯ |
ALT + 558 |
|
|
ḃ |
ALT + 7683 |
Ḃ |
ALT + 7682 |
|
|
ċ |
ALT + 0267 |
Ċ |
ALT + 0266 |
|
|
ḋ |
ALT + 7691 |
Ḋ |
ALT + 7690 |
|
|
ḟ |
ALT + 7711 |
Ḟ |
ALT + 7710 |
|
|
ġ |
ALT + 0289 |
Ġ |
ALT + 0288 |
|
|
ḣ |
ALT + 7715 |
Ḣ |
ALT + 7714 |
|
|
|
|
İ |
ALT + 0304 |
|
|
ṁ |
ALT + 7745 |
Ṁ |
ALT + 7744 |
|
|
ṅ |
ALT + 7749 |
Ṅ |
ALT + 7748 |
|
|
ṗ |
ALT + 7767 |
Ṗ |
ALT + 7766 |
|
|
ṙ |
ALT + 7769 |
Ṙ |
ALT + 7768 |
|
|
ṡ |
ALT + 7777 |
Ṡ |
ALT + 7776 |
|
|
ṫ |
ALT + 7787 |
Ṫ |
ALT + 7786 |
|
|
ẇ |
ALT + 7815 |
Ẇ |
ALT + 7814 |
|
|
ẋ |
ALT + 7819 |
Ẋ |
ALT + 7818 |
|
|
ẏ |
ALT + 7823 |
Ẏ |
ALT + 7822 |
|
|
ż |
ALT + 0380 |
Ż |
ALT + 0379 |
|
|
Dot Below |
ḅ |
ALT + 7685 |
Ḅ |
ALT + 7684 |
|
ḍ |
ALT + 7693 |
Ḍ |
ALT + 7692 |
|
|
ḥ |
ALT + 7717 |
Ḥ |
ALT + 7716 |
|
|
ḳ |
ALT + 7731 |
Ḳ |
ALT + 7730 |
|
|
ḷ |
ALT + 7735 |
Ḷ |
ALT + 7734 |
|
|
ṃ |
ALT + 7747 |
Ṃ |
ALT + 7746 |
|
|
ṇ |
ALT + 7751 |
Ṇ |
ALT + 7750 |
|
|
ṛ |
ALT + 7771 |
Ṛ |
ALT + 7770 |
|
|
ṣ |
ALT + 7779 |
Ṣ |
ALT + 7778 |
|
|
ṭ |
ALT + 7789 |
Ṭ |
ALT + 7788 |
|
|
ṿ |
ALT + 7807 |
Ṿ |
ALT + 7806 |
|
|
ẉ |
ALT + 7817 |
Ẉ |
ALT + 7816 |
|
|
ỵ |
ALT + 7925 |
Ỵ |
ALT + 7924 |
|
|
ẓ |
ALT + 7827 |
Ẓ |
ALT + 7826 |
|
|
Dot Middle |
ŀ |
ALT + 0320 |
Ŀ |
ALT + 0319 |
|
Dotless I |
ı |
ALT + 0305 |
|
|
|
Eng |
ŋ |
ALT + 0331 |
Ŋ |
ALT + 0330 |
|
Eth |
ð |
ALT + 0240 |
Ð |
ALT + 0208 |
|
Grave |
à |
ALT + 0224 |
À |
ALT + 0192 |
|
è |
ALT + 0232 |
È |
ALT + 0200 |
|
|
ì |
ALT + 0236 |
Ì |
ALT + 0204 |
|
|
ò |
ALT + 0242 |
Ò |
ALT + 0210 |
|
|
ù |
ALT + 0249 |
Ù |
ALT + 0217 |
|
|
ǹ |
ALT + 505 |
Ǹ |
ALT + 504 |
|
|
ẁ |
ALT + 7809 |
Ẁ |
ALT + 7808 |
|
|
ỳ |
ALT + 7923 |
Ỳ |
ALT + 7922 |
|
|
Grave Double |
ȁ |
ALT + 513 |
Ȁ |
ALT + 512 |
|
ȅ |
ALT + 517 |
Ȅ |
ALT + 516 |
|
|
ȉ |
ALT + 521 |
Ȉ |
ALT + 520 |
|
|
ȍ |
ALT + 525 |
Ȍ |
ALT + 524 |
|
|
ȕ |
ALT + 533 |
Ȕ |
ALT + 532 |
|
|
ȑ |
ALT + 529 |
Ȑ |
ALT + 528 |
|
|
Hook |
ⱳ |
ALT + 11379 |
Ⱳ |
ALT + 11378 |
|
ȥ |
ALT + 549 |
Ȥ |
ALT + 548 |
|
|
Hook Above |
ỷ |
ALT + 7927 |
Ỷ |
ALT + 7926 |
|
Hook Tail |
ɋ |
ALT + 587 |
Ɋ |
ALT` + 586 |
|
Line Below |
ḇ |
ALT + 7687 |
Ḇ |
ALT + 7686 |
|
ḏ |
ALT + 7695 |
Ḏ |
ALT + 7694 |
|
|
ḵ |
ALT + 7733 |
Ḵ |
ALT + 7732 |
|
|
ḻ |
ALT + 7739 |
Ḻ |
ALT + 7738 |
|
|
ṉ |
ALT + 7753 |
Ṉ |
ALT + 7752 |
|
|
ṟ |
ALT + 7775 |
Ṟ |
ALT + 7774 |
|
|
ṯ |
ALT + 7791 |
Ṯ |
ALT + 7790 |
|
|
ẕ |
ALT + 7829 |
Ẕ |
ALT + 7828 |
|
|
Long Right Leg |
ƞ |
ALT + 414 |
Ƞ |
ALT + 544 |
|
Macron |
ā |
ALT + 0257 |
Ā |
ALT + 0256 |
|
ē |
ALT + 0275 |
Ē |
ALT + 0274 |
|
|
ī |
ALT + 0299 |
Ī |
ALT + 0298 |
|
|
ō |
ALT + 0333 |
Ō |
ALT + 0332 |
|
|
ū |
ALT + 0363 |
Ū |
ALT + 0362 |
|
|
ḡ |
ALT + 7713 |
Ḡ |
ALT + 7712 |
|
|
ȳ |
ALT + 563 |
Ȳ |
ALT + 562 |
|
|
Oethel |
œ |
ALT + 0339 |
Π|
ALT + 0338 |
|
Ogonek |
ą |
ALT + 0261 |
Ą |
ALT + 0260 |
|
ę |
ALT + 0281 |
Ę |
ALT + 0280 |
|
|
į |
ALT + 0303 |
Į |
ALT + 0302 |
|
|
ǫ |
ALT + 491 |
Ǫ |
ALT + 490 |
|
|
ų |
ALT + 0371 |
Ų |
ALT + 0370 |
|
|
Ring |
å |
ALT + 0229 |
Å |
ALT + 0197 |
|
ů |
ALT + 0367 |
Ů |
ALT + 0366 |
|
|
Ring Below |
ḁ |
ALT + 7681 |
Ḁ |
ALT + 7680 |
|
Sharp S |
ß |
ALT + 0223 |
ẞ |
ALT + 7838 |
|
Stroke (Bar) |
ⱥ |
ALT + 11365 |
Ⱥ |
ALT + 570 |
|
ɇ |
ALT + 583 |
Ɇ |
ALT + 582 |
|
|
ƀ |
ALT + 384 |
Ƀ |
ALT + 579 |
|
|
ȼ |
ALT + 572 |
Ȼ |
ALT + 571 |
|
|
đ |
ALT + 0273 |
Đ |
ALT + 0272 |
|
|
ǥ |
ALT + 485 |
Ǥ |
ALT + 484 |
|
|
ħ |
ALT + 0295 |
Ħ |
ALT + 0294 |
|
|
ɉ |
ALT + 585 |
Ɉ |
ALT + 584 |
|
|
ł |
ALT + 0322 |
Ł |
ALT + 0321 |
|
|
ø |
ALT + 0248 |
Ø |
ALT + 0216 |
|
|
ɍ |
ALT + 589 |
Ɍ |
ALT + 588 |
|
|
Ŧ |
ALT + 0359 |
Ŧ |
ALT + 0358 |
|
|
ʉ |
ALT + 649 |
Ʉ |
ALT + 580 |
|
|
ɏ |
ALT + 591 |
Ɏ |
ALT + 590 |
|
|
Stroke Diagonal |
ⱦ |
ALT + 11366 |
Ⱦ |
ALT + 574 |
|
Thorn |
þ |
ALT + 0254 |
Þ |
ALT + 0222 |
|
Tilde |
ã |
ALT + 0227 |
à |
ALT + 0195 |
|
ĩ |
ALT + 0297 |
Ĩ |
ALT + 0296 |
|
|
ñ |
ALT + 0241 |
Ñ |
ALT + 0209 |
|
|
õ |
ALT + 0245 |
Õ |
ALT + 0213 |
|
|
ũ |
ALT + 0361 |
Ũ |
ALT + 0360 |
|
|
ṽ |
ALT + 7805 |
Ṽ |
ALT + 7804 |
|
|
ỹ |
ALT + 7929 |
Ỹ |
ALT + 7928 |
|
|
Tilde Below |
ḛ |
ALT + 7707 |
Ḛ |
ALT + 7706 |
|
ḭ |
ALT + 7725 |
Ḭ |
ALT + 7724 |
|
|
ṵ |
ALT + 7797 |
Ṵ |
ALT + 7796 |
|
|
Umlaut |
ä |
ALT + 0228 |
Ä |
ALT + 0196 |
|
ë |
ALT + 0235 |
Ë |
ALT + 0203 |
|
|
ï |
ALT + 0239 |
Ï |
ALT + 0207 |
|
|
ö |
ALT + 0246 |
Ö |
ALT + 0214 |
|
|
ü |
ALT + 0252 |
Ü |
ALT + 0220 |
|
|
ÿ |
ALT + 0255 |
Ÿ |
ALT + 0376 |
Complex Diacriticals
|
DESCRIPTION |
LOWERCASE EXAMPLE | KEY COMBINATION | UPPERCASE EXAMPLE | KEY COMBINATION |
|---|---|---|---|---|
|
Acute and Dot Above |
ṥ |
ALT + 7781 |
Ṥ |
ALT + 7780 |
|
Ash with Acute |
ǽ |
ALT + 509 |
Ǽ |
ALT + 508 |
|
Ash with Macron |
ǣ |
ALT + 483 |
Ǣ |
ALT + 482 |
|
Caron and Dot Above |
ṧ |
ALT + 7783 |
Ṧ |
ALT + 7782 |
|
Cedilla and Acute |
ḉ |
ALT + 7689 |
Ḉ |
ALT + 7688 |
|
Cedilla and Breve |
ḝ |
ALT + 7709 |
Ḝ |
ALT + 7708 |
|
Diaresis and Acute |
ḯ |
ALT + 7727 |
Ḯ |
ALT + 7726 |
|
ǘ |
ALT + 472 |
Ǘ |
ALT + 471 |
|
|
Diaresis and Caron |
ǚ |
ALT + 474 |
Ǚ |
ALT + 473 |
|
Diaresis and Grave |
ǜ |
ALT + 476 |
Ǜ |
ALT + 475 |
|
Diaresis and Macron |
ǟ |
ALT + 479 |
Ǟ |
ALT + 478 |
|
ȫ |
ALT + 555 |
Ȫ |
ALT + 554 |
|
|
ǖ |
ALT + 470 |
Ǖ |
ALT + 469 |
|
|
Dot Above and Macron |
ǡ |
ALT + 481 |
Ǡ |
ALT + 480 |
|
ȱ |
ALT + 561 |
Ȱ |
ALT + 560 |
|
|
Dot Below and Dot Above |
ṩ |
ALT + 7785 |
Ṩ |
ALT + 7784 |
|
Dot Below and Macron |
ḹ |
ALT + 7737 |
Ḹ |
ALT + 7736 |
|
ṝ |
ALT + 7773 |
Ṝ |
ALT + 7772 |
|
|
Ligatures |
|
|
Dz |
ALT + 498 |
|
dz |
ALT + 499 |
DZ |
ALT + 497 |
|
|
|
|
Dž |
ALT + 453 |
|
|
dž |
ALT + 454 |
DŽ |
ALT + 452 |
|
|
ij |
ALT + 0307 |
IJ |
ALT + 0306 |
|
|
|
|
Lj |
ALT + 456 |
|
|
lj |
ALT + 457 |
LJ |
ALT + 455 |
|
|
|
|
Nj |
ALT + 459 |
|
|
nj |
ALT + 460 |
NJ |
ALT + 458 |
|
|
Macron and Acute |
ḗ |
ALT + 7703 |
Ḗ |
ALT + 7702 |
|
ṓ |
ALT + 7763 |
Ṓ |
ALT + 7762 |
|
|
Macron and Diaresis |
ṻ |
ALT + 7803 |
Ṻ |
ALT + 7802 |
|
Macron and Grave |
ḕ |
ALT + 7701 |
Ḕ |
ALT + 7700 |
|
ṑ |
ALT + 7761 |
Ṑ |
ALT + 7760 |
|
|
Ogonek and Macron |
ǭ |
ALT + 493 |
Ǭ |
ALT + 492 |
|
Ou |
ȣ |
ALT + 547 |
Ȣ |
ALT + 546 |
|
Ring Above and Acute |
ǻ |
ALT + 507 |
Ǻ |
ALT + 506 |
|
Stroke and Acute |
ǿ |
ALT + 511 |
Ǿ |
ALT + 510 |
|
Tilde and Acute |
ṍ |
ALT + 7757 |
Ṍ |
ALT + 7756 |
|
ṹ |
ALT + 7801 |
Ṹ |
ALT + 7800 |
|
|
Tilde and Diaresis |
ṏ |
ALT + 7759 |
Ṏ |
ALT + 7758 |
|
Tilde and Macron |
ȭ |
ALT + 557 |
Ȭ |
ALT + 556 |
Punctuation, Signs, and Symbols
|
DESCRIPTION |
EXAMPLE | KEY COMBINATION | ||
|---|---|---|---|---|
|
Currency |
Cent |
¢ |
ALT + 0162 |
|
|
Pound |
£ |
ALT + 0163 |
||
|
Generic |
¤ |
ALT + 164 |
||
|
Yen |
¥ |
ALT + 0165 |
||
|
Peseta |
₧ |
ALT + 158 |
||
|
Euro |
€ |
ALT + 128 |
||
|
Dagger |
Single |
† |
ALT + 134 |
|
|
Double |
‡ |
ALT + 135 |
||
|
Dash |
Em |
— |
ALT + 151 |
|
|
En |
– |
ALT + 150 |
||
|
Degree |
° |
ALT + 0176 |
||
|
Ellipsis |
… |
ALT + 133 |
||
|
Fraction
|
Quarter |
¼ |
ALT + 0188 |
|
|
Half |
½ |
ALT + 0189 |
||
|
Three-Quarter |
¾ |
ALT + 0190 |
||
|
Inverted Exclamation Mark |
¡ |
ALT + 0161 |
||
|
Inverted Question Mark |
¿ |
ALT + 0191 |
||
|
Mark |
Copyright |
© |
ALT + 169 |
|
|
Registered |
® |
ALT + 174 |
||
|
Trade |
™ |
ALT + 153 |
||
|
Per mille |
‰ |
ALT + 137 |
||
|
Pilcrow |
¶ |
ALT + 0182 |
||
|
Quotation Mark |
Double Left |
“ |
ALT + 147 |
|
|
Double Right |
” |
ALT + 148 |
||
|
Double Low-9 |
„ |
ALT + 132 |
||
|
Double Angle Left |
« |
ALT + 0171 |
||
|
Double Angle Right |
» |
ALT + 0187 |
||
|
Single Left |
‘ |
ALT + 145 |
||
|
Single Right |
’ |
ALT + 146 |
||
|
Single Low-9 |
‚ |
ALT + 130 |
||
|
Single Angle Left |
‹ |
ALT + 139 |
||
|
Single Angle Right |
› |
ALT + 155 |
||
|
Section Sign |
§ |
ALT + 0167 |
||
|
Superscript |
One |
¹ |
ALT + 185 |
|
|
Squared |
² |
ALT + 0178 |
||
|
Cubed |
³ |
ALT + 179 |
||
|
Feminine ordinal |
ª |
ALT + 0170 |
||
|
Masculine ordinal |
º |
ALT + 0186 |
||
|
Latin small n |
ⁿ |
ALT + 252 |
||
Windows Regional and Language Options control several options on your computer that may vary by regions. You can edit documents in multiple languages by changing the language (the input language) in which you type. Input languages are included with Windows, but you need to add them to your list of languages before you can use them.
Important Note: Whenever changing languages, be sure you have "English (United States)" selected as your default Windows Display Language. If not, your Windows system will render in the language you defaulted to or the language that is at the top of your selection list.
- Click the Start menu and select Settings.
- Select the Time and Language tab on the left-hand side of the settiings window.
- Click on Language & Region bar.
- Under the "Language" section, under the "Preferred Languages" setting, click the "Add a Language" button.

- In the search bar at the top of the “Choose a Language to Install” menu option, type in your language and select the main keyboard for that language. In this example, we typed in "Arabic" and selected the "Arabiic (Jordan) keyboard.
Press the Next button to continue.
Although the main keyboard stays the same, you may want to select a specific language region corresponding to the area of the Arab world you will most likely be focusing on. General guidelines are:
Levantine Arabic - We recommend using the Arabic (Jordan) setting
Egyptian Arabic - We recommend using the Arabic (Egypt) setting
Modern Standard Arabic - We recommend using the Arabic (Saudi Arabia) setting
- If there are any special options you want enabled, such as iadding in Touch interfaces, Handwriting interfaces, or Text-to-Speech, enable them in this next step.
Click the Install button to add the language and options to Windows.
- Once the language is installed successfully, the Language window will display both English and your selected Language options. If you want to add a different keyboard from the default selection given or want to modify language settings, click the [...] icon in the right-hand end of the language bar and select ... Language Options.

- The default keyboard will be the Arabic 101 layout.
You can also enable or modify different language features in this window, such as enabling a strict final yaa or a strict intial alef hazma by toggling the On-Off switches for each feature.
- Close out of the Settings panel.
- In the lower right-hand corner of your Windows desktop, you should see a language option entitled ENG. This means you have English set for your keyboard. Click the ENG button on your system tray and select the Arabic keyboard to change the language.
Arabic is enabled when you see the [ع] icon instead of the [ENG] icon in the system tray.
Using the Arabic Keyboard in Windows 11
The standard Arabic keyboard is what most users see in the Middle East and in most Arabic speaking areas.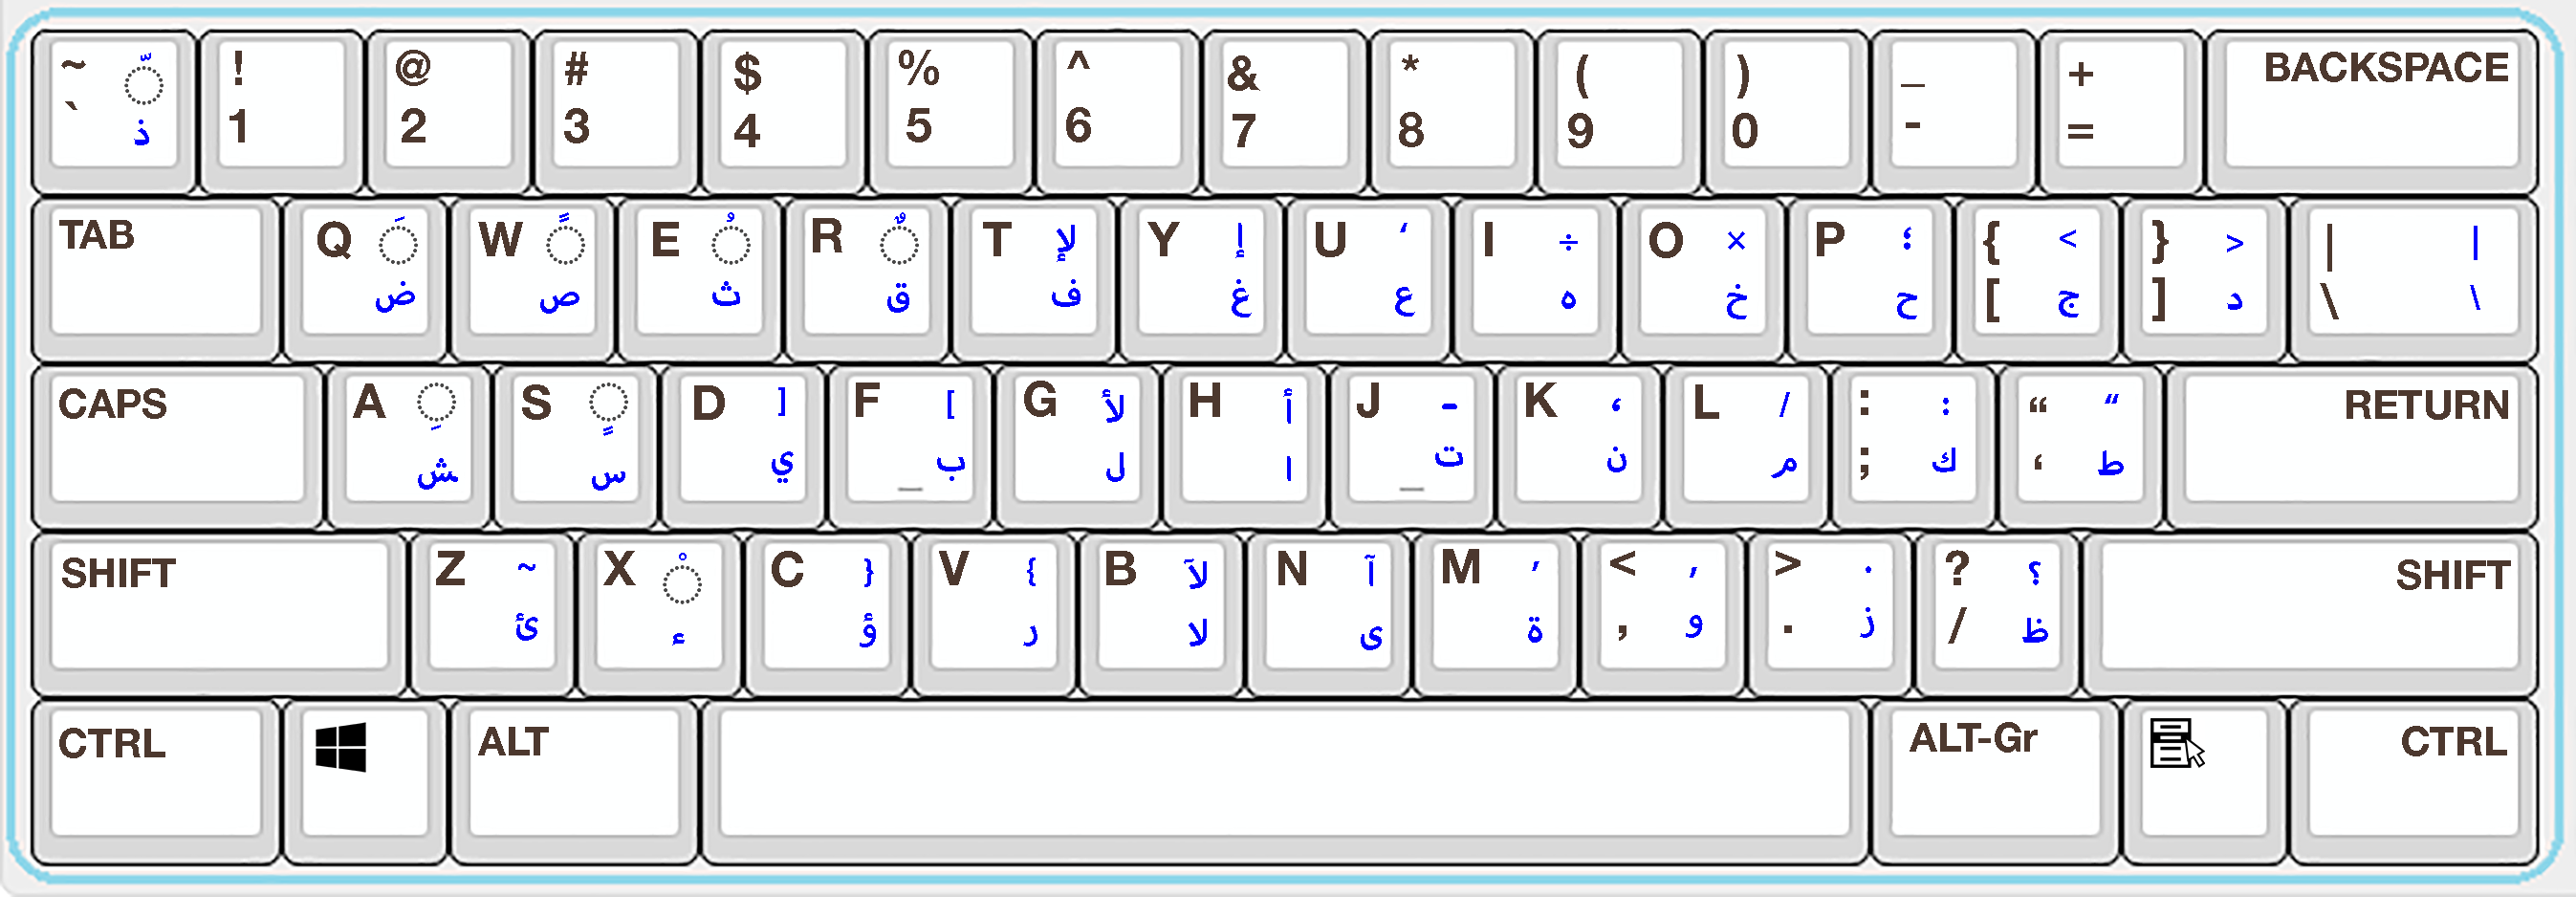
Please note that Windows does not automatically give you Arabic Indic numbers as part of the built-in keyboard. If you need to use Arabic Indic numbers, you will need to install the Arabic Microsoft Language Pack for Microsoft Office and configure it within Microsoft Word to access the numbers.
Windows Regional and Language Options control several options on your computer that may vary by regions. You can edit documents in multiple languages by changing the language (the input language) in which you type. Input languages are included with Windows, but you need to add them to your list of languages before you can use them.
Important Note: Whenever changing languages, be sure you have "English (United States)" selected as your default Windows Display Language. If not, your Windows system will render in the language you defaulted to or the language that is at the top of your selection list.
- Click the Start menu and select Settings.
- Select the Time and Language tab on the left-hand side of the settiings window.
- Click on Language & Region bar.
- Under the "Language" section, under the "Preferred Languages" setting, click the "Add a Language" button.
- In the search bar at the top of the “Choose a Language to Install” menu option, type in your language and select the main keyboard for that language. In this example, we typed in "Chinese".
For beginning Chinese Mandarin learners, we recommend that you select the "Chinese (Simplified, China)" keyboard option.
For advanced Chinese Mandarin learners who are learning traditional characters, we recommend that you select the "Chinese (Traditional, Taiwan)" keyboard option.
Press the Next button to continue.
- If there are any special options you want enabled, such as installaing a Language Pack, adding in Touch interfaces, Handwriting interfaces, or Text-to-Speech, enable them in this next step.
Click the Install button to add the language and options to Windows.
- Once the language is installed successfully, the Language window will display both English and your selected Language options. If you want to add a different keyboard from the default selection given or want to modify language settings, click the [...] icon in the right-hand end of the language bar and select ... Language Options.

- For the Chinese (Simplified, China) keyboard selection, your default keyboard will be the Microsoft IME layout (Input Method Editor).
For Chinese students, we recommend using Microsoft Pinyin for character entry.
- If you want to enable advanced settings, click the [...] icon in the right-hand end of the lMicrosoft Pinyin bar and select ... Keyboard Options. From there, you can customize several things under the categories of General, Keys, Appearance, Lexicon and Self-Learning, or Advanced.

- When all your settings are customized to your satisfation, close out of the Settings panel.
- In the lower right-hand corner of your Windows desktop, you should see a language option entitled ENG. This means you have English set for your keyboard. Click the ENG button on your system tray to change the language. The Chinese Microsoft IME icon will have a stylized [拼] icon.

- To the left of the IME selection you will see either an [中] icon or a [英] icon. For English letter input, select the [英] mode. For pinyin input, select the [中] mode.
- When you right-click on the Microsoft IME [拼] icon, you can select between various options, such as setting character width to half or full, selecting various charater sets, using Emoji, etc. There are also several Windows keyboard shortcuts to speed up character entry as you become more proficient in using the Microsoft IME.
Here are some general keyboard shortcuts as you work within the Microsoft IME:
| Press this key | To do this |
|---|---|
| Shift | Switch between English and Chinese mode. |
| Shift + Space | Switch character width between full-width and half-width. |
| Ctrl + symbol (e.g., Ctrl + comma) |
Insert the corresponding full-width symbol. Note: If a symbol corresponds to a shifted key, you need to press Shift before pressing the symbol key. (e.g., Ctrl + Shift + ? to insert “?”) |
| Backquote (`) + symbol key (e.g., Backquote + comma) |
Insert the corresponding full-width symbol. Note: If a symbol corresponds to a shifted key, you need to press Shift before pressing the symbol key. (e.g., Backquote + Shift + ? to insert “?”) Effective in Chinese mode. |
| Ctrl + Alt + comma |
Show the symbol keyboard. You can insert a symbol by continuously pressing a corresponding key. Note: Effective in Chinese mode. |
| Backquote (`) + U + Unicode + Space |
Insert a corresponding character (e.g., Backquote + U + “4e00” + Space to insert "一"). Note: Effective in Chinese mode. |
| Backquote (`) + B + Big5 codepoint |
Insert a corresponding character (e.g., Backquote + B + “A440” to insert "一"). Note: Effective in Chinese mode. |
Using Pinyin
For this input mode, you will want to select the Microsoft IME input source and then select the "中" symbol.
As you begin typing in Chinese Mandarin phonetically, a candidate window appears to give you various options of Mandarin. When you see the candidate you need, press the numberr key corresponding to the candidate and then press the space key to confirm the candidate. Your conversion then appears on the page you are typing in.
When you type, apostrophes are automatically inserted separating kanji, and the candidate list appears by default. To navigate the candidate list, there are just a few things to remember:
- To accept the highlighted choice, press Space or click/tap on that choice
- or type the number next a character, or click/tap on any character in the list
- To move through the list one-by-one, use the "down arrow" and "up arrow" keys
- to move through the list page-by-page:
hover over an end to reveal an arrow button and click there, or
press the "[" and "]" bracket keys, or
press the "Page up" and "Page down" keys - Click on the smiley face at the far right end of the candidate list or press Ctrl-Shift-B to bring up the list.
Windows Regional and Language Options control several options on your computer that may vary by regions. You can edit documents in multiple languages by changing the language (the input language) in which you type. Input languages are included with Windows, but you need to add them to your list of languages before you can use them.
Important Note: Whenever changing languages, be sure you have "English (United States)" selected as your default Windows Display Language. If not, your Windows system will render in the language you defaulted to or the language that is at the top of your selection list.
- Click the Start menu and select Settings.
- Select the Time and Language tab on the left-hand side of the settiings window.
- Click on Language & Region bar.
- Under the "Language" section, under the "Preferred Languages" setting, click the "Add a Language" button.
- In the search bar at the top of the “Choose a Language to Install” menu option, type in your language and select the main keyboard for that language. In this example, we typed in "Greek".
We recommend using the main Greek language option.
Press the Next button to continue.
- If your selected language provides for it, make sure that “basic typing” is checked, and choose optional add-ons such as Speech and Handwriting.
Press the Install button to continue.
- Once the language is installed successfully, the Language window will display both English and your selected Language options.
Now we need to add a different keyboard from the default selection given. Click the [...] icon in the right-hand end of the language bar and select ... Language Options.
- To add the Greek Polytonic keyboard instead of the default keyboard, click on your selected Language, and then click the Add a Keyboard button that appears to the right of the installed keyboards setting.
Select the Greek Polytonic keyboard.
- Since we only want the Greek Polytonic keyboard, we can remove the modern Greek keyboard. Click the [...] icon in the right-hand end of the Greek keyboard selection and select ... Remove. The only Greek keyboard left should be the Greek Polytonic keyboard.

- Close out of the Settings panel.
- In the lower right-hand corner of your Windows desktop, you should see a language option entitled ENG. This means you have English set for your keyboard. Click the ENG button on your system tray to change the language. The Greek Polytonic keyboard icon will have a stylized [ΕΛ] symbol.

Using the Greek Polytonic Keyboard in Windows 11
The Greek polytonic keyboard is set up very similarly to the QWERTY English keyboard. The notible exception is on the far right-hand side of the keyboard, where several accent and breath mark glyphs can be combined with other letters.


For punctuation:
| Punctuation | Type This Key Combination | Examples |
|---|---|---|
| Question Mark | Q + space bar | ; |
| Half Stop | shift + AltGr + ] (right bracket key) | · |
There are three different types of accents in Ancient Greek. The acute, the circumflex, and the grave. Ancient Greek was originally a tonal language - this meant that the pitch of a word made a difference to its meaning. The acute accent used to indicate a higher pitch, the grave a lower pitch, and the circumflex a higher then immediately lower pitch. Later they simply indicated on which syllable the emphasis landed.
| Accent | Type This Key Combination | Examples |
|---|---|---|
| Acute | ; (semicolon) key, then vowel | ά έ ό |
| Grave | ] (right bracket) key, then vowel | ὰ ὲ ὸ |
| Circumflex | [ (left bracket) key, then vowel | ᾶ ῖ ῦ |
| Macron | - (dash) key, then vowel | ā ī ō |
Every Greek word that begins with a vowel (α,ε,η,ι,ο,υ, and ω) will have something called a breathing mark. These look like apostrophes and can be either rough or smooth.
Rough Breathings
If the breathing is rough then it is an apostrophe curved in the opposite direction (ἑ,ἁ,ἡ, etc...) If a breathing is rough then the word is pronounced as if there were an /h/ in front of it.
Smooth Breathings
If the breathing mark is smooth (ἀ,ἐ,ὀ, etc...) then it is shaped exactly like an apostrophe and comes either slightly before the vowel or directly above. Smooth breathing marks simply mean there is no /h/ pronounciation.
Exception
The only consonant that takes a breathing mark is the letter rho (ρ). If rho is the first letter of a word then it always has a rough breathing mark.
| Breath Mark | Type This Key Combination | Examples |
|---|---|---|
| Smooth Breath | ‘ (apostrophe) key, then vowel | ἀ ἐ ὀ |
| Smooth Breath + Acute | / (slash) key, then vowel | ἄ ἔ ὄ |
| Smooth Breath + Grave | \ (backslash) key, then vowel | ἂ ἒ ὂ |
| Smooth Breath + Circumflex | = (equal sign) key, then vowel | ἆ ἶ ὖ |
| Rough Breath | Shift + ‘ (apostrophe) key, then vowel | ἁ ἑ ὁ |
| Rough Breath + Acute | Shift + / (slash) key, then vowel | ἅ ἔ ὅ |
| Rough Breath + Grave | Shift + \ (backslash) key, then vowel | ἃ ἓ ὃ |
| Rough Breath + Circumflex | Shift + = (equal sign) key, then vowel | ἇ ἷ ὗ |
| Rough Breath + Rho | Shift + ‘ (apostrophe) key, then r | ῥ |
An iota subscript is an iota written under either α, η, or ω, and helps to identify the function of the word, often signalling the dative case. The iota subscript is not pronounced, but simply helps to identify the word's function. When a Greek word with an iota subscript is written in capitals, the iota is promoted to the main line, following its vowel.
| Type This Key Combination | Examples | |
|---|---|---|
| Iota Subscript | Shift + [ (left bracket Key), then vowel | ᾳ ῃ ῳ |
| Iota Subscript + acute | AltGr + Q, then vowel | ᾴ ῄ ῴ |
| Iota Subscript + grave | AltGr + ] (right bracket) key, then vowel | ᾲ ῂ ῲ |
| Iota Subscript + circumflex | AltGr + [ (left bracket) key, then vowel | ᾷ ῇ ῷ |
| Iota Subscript + Smooth Breath | AltGr + ‘ (apostrophe) key, then vowel | ᾀ ᾐ ᾠ |
| Iota Subscript + Smooth Breath + acute | AltGr + / (slash) key, then vowel | ᾄ ᾔ ᾤ |
| Iota Subscript + Smooth Breath + grave | AltGr + \ (backslash) key, then vowel | ᾂ ᾒ ᾢ |
| Iota Subscript + Smooth Breath + circumflex | AltGr + = (equal sign) key, then vowel | ᾆ ᾖ ᾦ |
| Iota Subscript + Rough Breath | AltGr + Shift + ‘ (apostrophe) key, then vowel | ᾁ ᾑ ᾡ |
| Iota Subscript + Rough Breath + acute | AltGr + Shift + / (slash) key, then vowel | ᾅ ᾕ ᾥ |
| Iota Subscript + Rough Breath + grave | AltGr + Shift + \ (backslash) key, then vowel | ᾃ ᾓ ᾣ |
| Iota Subscript + Rough Breath + circumflex | AltGr + Shift + = (equal sign) key, then vowel | ᾇ ᾗ ᾧ |
Windows Regional and Language Options control several options on your computer that may vary by regions. You can edit documents in multiple languages by changing the language (the input language) in which you type. Input languages are included with Windows, but you need to add them to your list of languages before you can use them.
Important Note: Whenever changing languages, be sure you have "English (United States)" selected as your default Windows Display Language. If not, your Windows system will render in the language you defaulted to or the language that is at the top of your selection list.
- Click the Start menu and select Settings.
- Select the Time and Language tab on the left-hand side of the settiings window.
- Click on Language & Region bar.
- Under the "Language" section, under the "Preferred Languages" setting, click the "Add a Language" button.
- In the search bar at the top of the “Choose a Language to Install” menu option, type in your language and select the main keyboard for that language. In this example, we typed in "Japanese" and selected the main "Japanese" keyboard.
Press the Next button to continue.
- If your selected language provides for it, make sure that “basic typing” is checked, and choose optional add-ons such as Speech and Handwriting.
Press the Install button to continue.
- Once the language is installed successfully, the Language window will display both English and your selected Language options. If you want to add a different keyboard from the default selection given or want to modify language settings, click the [...] icon in the right-hand end of the language bar and select ... Language Options.

- For the Japanese keyboard selection, your default keyboard will be the Microsoft IME layout (Input Method Editor).
If you want to enable advanced settings, click the [...] icon in the right-hand end of the lMicrosoft IME bar and select ... Keyboard Options.
- From there, you can customize several things under the categories of General, Keys, Appearance, Lexicon and Self-Learning, or Advanced.

- When all your settings are customized to your satisfation, close out of the Settings panel.
- In the lower right-hand corner of your Windows desktop, you should see a language option entitled ENG. This means you have English set for your keyboard. Click the ENG button on your system tray to change the language. The Japanese IME icon will have a stylized "'J" within a circle.

- To the left of the IME selection you will see a roman letter [A] or the hiragana [あ] symbol. When the [A] symbol is selected, you can type in Romaji. When the [あ] symbol is selected, you can type in kana.
- When you click on the Microsoft IME icon, you can select between various input methods, such as Hiragana, Katakana, Half-Width, Romaji, etc. There are also several Windows keyboard shortcuts to speed up character entry as you become more proficient in using the Microsoft IME.
Here are some general keyboard shortcuts as you work within the Microsoft IME:
| Press this key | To do this |
|---|---|
| Alt + Backquote (`) | Turn on / off Japanese input. |
| Ctrl + Caps lock | Equivalent to Hiragana key on a Japanese keyboard (106/109 key). |
| Alt + Caps lock | Equivalent to Shift + Hiragana key on a Japanese keyboard (106/109 key). |
| Shift + Caps lock | Equivalent to Eisu key on a Japanese keyboard (106/109 key). |
| Ctrl + Delete | Remove the selected candidate from the prediction candidate window. |
| Ctrl + B | Search the selected candidate in the prediction candidate window. |
| Tab | Expand / collapse the table view in the conversion candidate window. |
| Windows logo key + period (.) | Open Emoji picker. |
| Ctrl + Shift + F10 | Turn on / off IME private mode. |
| F6 | Convert input string to Hiragana. |
| F7 | Convert input string to Full-width Katakana. |
| F8 | Convert input string to Half-width Katakana. |
| F9 | Convert input string to Full-width Alphanumeric. |
| F10 | Convert input string to Half-width Alphanumeric. |
Using the Romaji Input Mode
For this input mode, you will want to select the Microsoft IME input source and then select the [あ] symbol.
Right-Click on the "あ" symbol and select "Hiragana" or "Katakana" and turn Kana Input to "OFF"
The Romaji typing method is useful when you’re not using a Japanese keyboard; text you type is automatically converted to hiragana.
You use a regular U. S. keyboard and type out hiragana or katakana phonetically.
For example, to type こんにちわ, you would type you K O N N I C H I W A. As you type, the roman letters will be automatically converted to hiragana, so that K O become こ in the candidate window, N N become ん, I C H I becomes 日 (then you scroll down to find にち in the candidate window), and then finally W A becomes わ.
Another example would be ようこそ, where you type Y O O K O S O and the candidate window will present you with various cominations of hiragana and/or katakana and/or kanji until you find the correct candiate combination.
Using the Kana Input Mode
For this input mode, you will want to select the Microsoft IME input source and then select the [あ] symbol.
Right-Click on the "あ" symbol and select "Hiragana" or "Katakana" and turn Kana Input to "ON"
Typing in Kana will be like typing on a Japanese native keyboard or on a computer used in Japan.
Hiragana Layout

Katakana Layout

Windows Regional and Language Options control several options on your computer that may vary by regions. You can edit documents in multiple languages by changing the language (the input language) in which you type. Input languages are included with Windows, but you need to add them to your list of languages before you can use them.
Important Note: Whenever changing languages, be sure you have "English (United States)" selected as your default Windows Display Language. If not, your Windows system will render in the language you defaulted to or the language that is at the top of your selection list.
- Click the Start menu and select Settings.
- Select the Time and Language tab on the left-hand side of the settiings window.
- Click on Language & Region bar.
- Under the "Language" section, under the "Preferred Languages" setting, click the "Add a Language" button.
- In the search bar at the top of the “Choose a Language to Install” menu option, type in your language and select the main keyboard for that language. In this example, we typed in "Korean".
Press the Next button to continue.
- If your selected language provides for it, make sure that “basic typing” is checked, and choose optional add-ons such as Speech and Handwriting.
Press the Install button to continue.
- Once the language is installed successfully, the Language window will display both English and your selected Language options. If you want to add a different keyboard from the default selection given or want to modify language settings, click the [...] icon in the right-hand end of the language bar and select ... Language Options.

- For the Korean keyboard selection, your default keyboard will be the Microsoft IME layout (Input Method Editor).
If you want to enable advanced settings, click the [...] icon in the right-hand end of the lMicrosoft IME bar and select ... Keyboard Options.
- From there, you can customize several things under the categories of General, Keys, Appearance, Lexicon and Self-Learning, or Advanced.

- When all your settings are customized to your satisfation, close out of the Settings panel.
- In the lower right-hand corner of your Windows desktop, you should see a language option entitled ENG. This means you have English set for your keyboard. Click the ENG button on your system tray to change the language. The Korean Microsoft IME icon will have a stylized [한] symbol.

- To the left of the IME selection you will see either a [A] symbol or a [가] symbol. For English letter input, select the [A] mode. For the standard Korean 2-set input, select the [가] mode.
- When you right-click on the Microsoft IME [한] icon, you can select between various options, such as setting character width to half or full, selecting Hanja conversion, etc.
For faster switching between Korean and English, you can simply press the Right-Alt (Alt-Gr) Key on the keyboard.
For typing 한자 (Chinese Characters), type the 한글 version of the word, and press the Right Ctrl Key on Keyboard to convert it to Hanja. As you press the Ctrl button, it will show you options in case there are other versions of 한자 characters for words.
Using the Korean Microsoft IME
For this input mode, you will want to select the Microsoft IME input source and then select the "가" symbol. As you begin typing in Korean, a candidate window appears to give you various options.
The Korean 2-set keyboard layout is designed so that consonants will be on the left side of the keyboard and vowels will be on the right side.

Windows Regional and Language Options control several options on your computer that may vary by regions. You can edit documents in multiple languages by changing the language (the input language) in which you type. Input languages are included with Windows, but you need to add them to your list of languages before you can use them.
Important Note: Whenever changing languages, be sure you have "English (United States)" selected as your default Windows Display Language. If not, your Windows system will render in the language you defaulted to or the language that is at the top of your selection list.
- Click the Start menu and select Settings.
- Select the Time and Language tab on the left-hand side of the settiings window.
- Click on Language & Region bar.
- Under the "Language" section, under the "Preferred Languages" setting, click the "Add a Language" button.
- In the search bar at the top of the “Choose a Language to Install” menu option, type in your language and select the main keyboard for that language. In this example, we typed in "Russian".
We recommend that you use the main Russian keyboard.
Press the Next button to continue.
- If your selected language provides for it, make sure that “basic typing” is checked, and choose optional add-ons such as Speech and Handwriting.
Press the Install button to continue.
- Once the language is installed successfully, the Language window will display both English and your selected Language options. If you want to add a different keyboard from the default selection given or want to modify language settings, click the [...] icon in the right-hand end of the language bar and select ... Language Options.

- Your default keyboard will be the Russian PC keyboard (ЙЦУКЕН) layout.
- To add a phontic keyboard instead of the default keyboard, click on the your selected Language, and then click the Add a Keyboard button that appears to the right of the installed keyboards setting.
For Russian students, we recommend that you select the "Russian - Mnemonic" keyboard, which will give you a phonetic keyboard layout.
- Close out of the Settings panel.
- In the lower right-hand corner of your Windows desktop, you should see a language option entitled ENG. This means you have English set for your keyboard. Click the ENG button on your system tray to change the language. The Russian keyboard icon will have a stylized [РУС] symbol.

Using the Russian Keyboard in Windows 11
Standard Russian Keyboard
The standard Russian keyboard is what most Russian users see in the Russian Federation and in most Russian speaking areas.

Russian Mnemonic Keyboard
Using the Russian mnemonic keyboard is pretty straight foward. Keys are mapped as phonetically as possible:

There are four "dead" keys on the Russian mnemonic keyboard which lead to other Russian letters when pressed in combination. These combinations are:
| Key Combination | Character | Key Combination | Character |
|---|---|---|---|
| y + Space Bar | ы | Shift + Y + Space Bar | Ы |
| j + Space | й | Shift + J + Space Bar | Й |
| y or j + e | э | Shift + Y or J + E | Э |
| y or j + o | ё | Shift + Y or J + O | Ё |
| y or j + u | ю | Shift + Y or J + U | Ю |
| s + Space Bar | с | Shift + S + Space Bar | С |
| s + c | щ | Shift + S + C | Щ |
| c + Space Bar | ц | Shift + C + Space Bar | Ц |
| c + h | ч | Shift + C + H | Ч |
Typing these key combinations will become easier over time, and eventually will be intuitive, as they follow a phonetic sequence as well. For example, as you type "SC" and get Щ or "JO" and get a Ё, the combinations become intuitive.
Macintosh Language Keyboard Configurations
Method One
The following key combinations are the most common for the Macintosh system using the US EXTENDED KEYBOARD.
First, certain keys become "prefix" or "dead" keys. It's similar to how accent marks are typed on mechanical typewriters. When pressing the Option key (or Option+Shift keys) and then the letter of the accent mark you wish to make, you will see the accent mark appear first with a colored space around the accent.
 When followed by a letter that can take an accent mark, this sequence creates the accented characters. Examples: á, ü, è, ô, ñ.
Second, other keys will work by simply pressing Option (or Option+Shift) and then the key.
 In the table below, if a combination has a plus sign (+), hold both keys simultaneously. If a comma (,) separates the key combination, release the keys you are holding and press the next set of keys.
| DESCRIPTION | EXAMPLE | KEY COMBINATION |
|---|---|---|
| Acute | é É |
OPTION + E, letter OPTION + E, SHIFT + letter |
| Acute Double | ő Ő |
OPTION + J, letter OPTION + J, SHIFT + letter |
| Arch (Inverted Breve) | ȇ Ȇ |
OPTION + SHIFT + S, letter OPTION + SHIFT + S, SHIFT + letter |
| Ash | æ Æ |
OPTION + ‘ OPTION + SHIFT+ ‘ |
| Breve | ĕ Ĕ |
OPTION + B, letter OPTION + B, SHIFT + letter |
| Bullet | • | OPTION + 8 |
| Caron (Hacheck) | ě Ě |
OPTION + V, letter OPTION + V, SHIFT + letter |
| Cedilla | ç Ç |
OPTION + C, letter OPTION + C, SHIFT + letter |
| Cent | ¢ | OPTION + 4 |
| Circumflex | ê Ê |
OPTION + 6, letter OPTION + 6, SHIFT + letter |
| Circumflex Below | ḙ Ḙ |
OPTION + SHIFT + G, letter OPTION + SHIFT + G, SHIFT + letter |
| Comma | ș Ș |
OPTION + P, letter OPTION + P, SHIFT + letter |
| Copyright Sign | © | OPTION + G |
| Dagger | † | OPTION + SHIFT + 5 |
| Dagger Double | ‡ | OPTION + SHIFT + 7 |
| Degree | ° | OPTION + SHIFT + 8 |
| Division Sign | ÷ | OPTION + / |
| Dot | ė Ė |
OPTION + W, letter OPTION + W, SHIFT + letter |
| Dot Below | ẹ Ẹ |
OPTION + X, letter OPTION + X, SHIFT + letter |
| Elipsis | … | OPTION + ; |
| Eth | ð Ð |
OPTION + D OPTION + SHIFT + D |
| Em Dash | – | OPTION + - |
| En Dash | — | OPTION + SHIFT + - |
| Euro | € | OPTION + SHIFT + 2 |
| Florin | ƒ | OPTION + F |
| French/Spanish Quote | « » |
OPTION + \ OPTION + SHIFT + \ |
| Grave | è È |
OPTION + `, letter OPTION + `, SHIFT + letter |
| Grave Double | ȅ Ȅ |
OPTION + SHIFT + Y, letter OPTION + SHIFT + Y, SHIFT + letter |
| Greater Than Or Equal To Sign | ≥ | OPTION + > |
| Hook | ẻ Ẻ |
OPTION + Z, letter OPTION + Z, SHIFT + letter |
| Hook Below | ȥ Ȥ |
OPTION + SHIFT + ., letter OPTION + SHIFT + ., SHIFT + letter |
| Horn | ơ Ơ |
OPTION + I, letter OPTION + I, SHIFT + letter |
| Inverted Exclamation Mark | ¡ | OPTION + 1 |
| Inverted Question Mark | ¿ | OPTION + SHIFT + / |
| Less Than Or Equal To Sign | ≤ | OPTION + < |
| Line Below | ḇ Ḇ |
OPTION + H, letter OPTION + H, SHIFT + letter |
| Macron | ē Ē |
OPTION + A, letter OPTION + A, SHIFT + letter |
| Not Equal To Sign | ≠ | OPTION + = |
| Oethel | œ Œ |
OPTION + q OPTION + SHIFT + q |
| Ogonek | ę Ę |
OPTION + M, letter OPTION + M, SHIFT + letter |
| Ordinal (Masculine) | º | OPTION + 0 |
| Ordinal (Feminine) | ª | OPTION + 9 |
| Paragraph Sign | ¶ | OPTION + 7 |
| Per Mille Sign | ‰ | OPTION + SHIFT + R |
| Plus-Minus Sign | ± | OPTION + SHIFT + = |
| Pound | £ | OPTION + 3 |
| Registered Sign | ® | OPTION + R |
| Ring | å Å |
OPTION + K, letter OPTION + K, SHIFT + letter |
| Section Sign | § | OPTION + 5 |
| Sharp S | ß | OPTION + S |
| Stroke O | ø Ø |
OPTION + O OPTION + SHIFT + O |
| Stroke or Bar | ƶ Ƶ |
OPTION + L, letter OPTION + L, SHIFT + letter |
| Thorn | þ Þ |
OPTION+ T OPTION + SHIFT + T |
| Tilde | ñ Ñ |
OPTION + N, letter OPTION + N, SHIFT + letter |
| Tilde Below | ḛ Ḛ |
OPTION + SHIFT + F, letter OPTION + SHIFT + F, SHIFT + letter |
| Trademark Sign | ™ | OPTION + 2 |
| Umlaut (Diaresis) | ë Ë |
OPTION + U, letter OPTION + U, SHIFT + letter |
| Yen | ¥ | OPTION + Y |
Method Two
These codes add accents to ANY Letter via Unicode. As a result, there may be unusual display issues with certain fonts or certain letters (e.g. capital letters).
To use these codes first type the letter, then type the code.
| DESCRIPTION | KEY COMBINATION |
|---|---|
| Combining Acute | letter, OPTION + SHIFT + E |
| Combining Acute Double | letter, OPTION + SHIFT + J |
| Combining Breve | letter, OPTION + SHIFT + B |
| Combing Caron (Hachek) | letter, OPTION + SHIFT + V |
| Combining Cedilla | letter, OPTION + SHIFT + C |
| Combining Circumflex | letter, OPTION + SHIFT + 6 |
| Combining Comma | letter, OPTION + SHIFT + P |
| Combining Dot Above | letter, OPTION + SHIFT + W |
| Combining Dot Below | letter, OPTION + SHIFT + X |
| Combining Grave | letter, OPTION + SHIFT + ` |
| Combining Horn | letter, OPTION + SHIFT + I |
| Combining Macron | letter, OPTION + SHIFT + A |
| Combining Macron Below | letter, OPTION + SHIFT + H |
| Combining Ogonek | letter, OPTION + SHIFT + M |
| Combining Ring | letter, OPTION + SHIFT + K |
| Combining Stroke | letter, OPTION + SHIFT + L |
| Combining Tilde | letter, OPTION + SHIFT + N |
| Combining Umlaut (Diaresis) | letter, OPTION + SHIFT + U |
Method Three
Fonts often contain many characters that don’t appear on the Apple keyboard. These characters include accented characters, math symbols, and special punctuation symbols. On some applications (Microsoft Word, for example), one simple way to access these characters is to press and hold the base character key for a second or so and you will see a popup menu with the extended character options. This works for all extended characters based on A, C, E, I, L, N, O, S, U, Y, and Z.- Open the System Preferences Panel by clicking on the Apple Menu in the upper-left-hand corner of your screen.
- Select System Settings.

- Scroll down through the settings option and click the Keyboard menu option.

- Scroll through all the keyboard options until you come to Text Input.
- Under the Input Sources setting, click the Edit... button.

- In the lower-left-hand corner of the panel, click the + button to add a language keyboard.

- In the list of languages presented, scroll down until you see English in the left-hand menu panel and click on the English option.
- In the right-hand menu panel, select the ABC - Extended option for English

- Click the Add button.
- Go ahead and close the System Setting panels once you have selected your language keyboard.
- In the upper-right-hand portion of your screen, you will see that some language selection options have appeared. Click on the Text Input menu option to select the ABC - Extended keyboard.

- Your text input option should have turned to an [A] icon. You now have the US Extended keyboard enabled and can begin typing latin characters using unified diacritical input settings.
- Open the System Preferences Panel by clicking on the Apple Menu in the upper-left-hand corner of your screen.
- Select System Settings.
- Scroll down through the settings option and click the Keyboard menu option.
- Scroll through all the keyboard options until you come to Text Input.
- Under the Input Sources setting, click the Edit... button.
- In the lower-left-hand corner of the panel, click the + button to add a language keyboard.
- In the list of languages presented, scroll down until you see Arabic in the left-hand menu panel and click on the English option.
- In the right-hand menu panel, select the "Arabic - QWERTY" or "Arabic - PC" option.

- Click the Add button.
- Once you select either the "Arabic - QWERTY" or "Arabic - PC" option, you can choose to select either natural selection of Arabic as you type. You can also enable some keyboard shortcuts to enable faster input of Arabic, especially if you are switching between Arabic and another language often.

- Go ahead and close the System Setting panels once you have selected your language keyboard.
- In the upper-right-hand portion of your screen, you will see that some language selection options have appeared. Click on the Text Input menu option to select the ABC - Extended keyboard.

- Your text input option should have turned to an [ع] icon. You now have an Arabic keyboard enabled and can begin typing.
Using the Arabic Keyboard
QWERTY Layout Option:
The basic layout of the Arabic-QWERTY keyboard maps most of the Arabic glyphs phonetically to their U. S. letter counterparts.

By pressing the Option key or Shift-Option key combination, more glyphs and other useful characters become available.

PC Layout Option:
The basic layout of the Arabic-PC keyboard maps most of the Arabic glyphs as you would find on a computer in the Middle East or in most of the Arab speaking world.

By pressing the Option key or Shift-Option key combination, more glyphs and other useful characters become available.

- Open the System Preferences Panel by clicking on the Apple Menu in the upper-left-hand corner of your screen.
- Select System Settings.
- Scroll down through the settings option and click the Keyboard menu option.
- Scroll through all the keyboard options until you come to Text Input.
- Under the Input Sources setting, click the Edit... button.
- In the lower-left-hand corner of the panel, click the + button to add a language keyboard.
- In the list of languages presented, scroll down until you see Chinese, Simplified in the left-hand menu panel and click on the English option.
If you are an advanced learner of Chinese and are using traditional characters, then you will want to select Chinese, Traditional as your language option. For these instructions, however, we will focus on the Chinese, Simplified layout and settings. - In the right-hand menu panel, select the "Pinyin - Simplified" option.

- Click the Add button.
- Once you have selected your keyboard layout preference, you will see a list of options in the right-hand pane.
In this window, you can customized how big you want your candidate window to be and whether you would like to see horizontal or vertiical formats, shor predictive completions of kanji, and select regional dialect influcences.
- Go ahead and close the System Setting panels once you have selected your language keyboard.
- In the upper-right-hand portion of your screen, you will see that some language selection options have appeared. Click on the Text Input menu option to select the Pinyin - Simplified keyboard.

- Your text input option should have turned to an [拼] icon. You now have the Chinese Simplified Pinyin keyboard enabled and can begin typing in Chinese. Along with the various input methods shown, additional options will be directly available to select should you need to change customizations.
Using Pinyin
As you begin typing in Chinese Mandarin phonetically, a candidate window appears to give you various options of Mandarin. When you see the candidate you need, press the number key corresponding to the candidate and then press the space key to confirm the candidate. Your conversion then appears on the page you are typing in.
Enter Chinese characters using Pinyin - SimplifiedOn your Mac, switch to the Pinyin - Simplified input source.
In an app, do any of the following:
- Enter Pinyin: Type the input codes for the characters you want to use, then select the characters in the Candidate window. For example, to enter 苹, type “ping”, then select 苹 in the window.
- Enter Full Pinyin (Quanpin): Type the input codes for the characters you want to use, then select the characters in the Candidate window. For example, to enter 西安, type “xi’an”, then select 西安 in the window.
Use an apostrophe to separate syllables that have ambiguous parsings. Full Pinyin has modifications that make typing more convenient; for example, “v” is used to replace “ü” (so to enter 绿, you would type “lv”). - Enter Abbreviated Pinyin (Jianpin): Type the consonant of each syllable in an input code, then select characters in the Candidate window. For example, to enter 计算机, type “jsj” (the input code is “jisuanji”).
You can use both full and abbreviated Pinyin in the same conversion. For example, if you type “pingguogs” with “gongsi” abbreviated to “gs”, the result is still “苹果公司”. - Enter Structural Pinyin (Chaizi): Type a Chaizi input code with two or more syllables, then press Shift-Space bar. For example, type “jiji”, then press Shift-Space bar. The Candidate window opens, and the first candidates shown in the Composition pane are 喆, 兓, and 旣.
With structural Pinyin, each syllable of the input sequence is treated as the Pinyin for one of the components in the character (in order from left to right and top to bottom). - Show the keyboard layout: Click the Input menu in the menu bar, then choose Show Keyboard Viewer.
Enter Chinese characters using Stroke with Pinyin - Simplified
On your Mac, switch to the Pinyin - Simplified input source.
In an app, use a prefix key (u), followed (without a space) by the stroke input code for a character. For example, you can type the following:
| Stroke Within Pinyin | Keyboard Key |
|---|---|
| 一 | H |
| 丨 | S |
| 丿 | P |
| 丶(乀) | N |
| 乛(乙) | Z |
| *wildcard | X |
If you type “unnzzsh”, you get 字 as the first candidate.
You can also add words to your user dictionary to save time when you need to type the same word again.
For example, you may need to change preferences to show predictive completions, enable regional dialect support, or change the orientation of the Candidate window.
- Open the System Preferences Panel by clicking on the Apple Menu in the upper-left-hand corner of your screen.
- Select System Settings.
- Scroll down through the settings option and click the Keyboard menu option.
- Scroll through all the keyboard options until you come to Text Input.
- Under the Input Sources setting, click the Edit... button.
- In the lower-left-hand corner of the panel, click the + button to add a language keyboard.
- In the list of languages presented, scroll down until you see Greek in the left-hand menu panel and click on the English option.
- In the right-hand menu panel, select the Greek - Polytonic option for Ancient Greek.

- Click the Add button.
- Go ahead and close the System Setting panels once you have selected your language keyboard.
- In the upper-right-hand portion of your screen, you will see that some language selection options have appeared. Click on the Text Input menu option to select the Greek Polytonic.

- Your text input option should have turned to an [λ] icon. You now have the Greek Polytonic keyboard enabled and can begin typing Ancient Greek.
Using the Greek Polytonic Keyboard
The Greek polytonic keyboard is set up very similarly to the QWERTY English keyboard. The notible exception is on the far right-hand side of the keyboard, where several accent and breath mark glyphs can be combined with other letters.

By pressing the Option key or Shift-Option key combination, more Greek characters and other useful characters for Ancient Greek become available.

There are three different types of accents in Ancient Greek. The acute, the circumflex, and the grave. Ancient Greek was originally a tonal language - this meant that the pitch of a word made a difference to its meaning. The acute accent used to indicate a higher pitch, the grave a lower pitch, and the circumflex a higher then immediately lower pitch. Later they simply indicated on which syllable the emphasis landed.
| Accent | Type This Key Combination | Examples |
|---|---|---|
| Acute | ; (semicolon) + vowel | ά έ ό |
| Grave | ] (right bracket) + vowel | ὰ ὲ ὸ |
| Circumflex | [ (left bracket) + vowel | ᾶ ῖ ῦ |
Every Greek word that begins with a vowel (α,ε,η,ι,ο,υ, and ω) will have something called a breathing mark. These look like apostrophes and can be either rough or smooth.
Rough Breathings
If the breathing is rough then it is an apostrophe curved in the opposite direction (ἑ,ἁ,ἡ, etc...) If a breathing is rough then the word is pronounced as if there were an /h/ in front of it.
Smooth Breathings
If the breathing mark is smooth (ἀ,ἐ,ὀ, etc...) then it is shaped exactly like an apostrophe and comes either slightly before the vowel or directly above. Smooth breathing marks simply mean there is no /h/ pronounciation.
Exception
The only consonant that takes a breathing mark is the letter rho (ρ). If rho is the first letter of a word then it always has a rough breathing mark.
| Breath Mark | Type This Key Combination | Examples |
|---|---|---|
| Smooth Breath | ' (apostrophe) + vowel | ἀ ἐ ὀ |
| Smooth Breath + Acute | / (slash) + vowel | ἄ ἔ ὄ |
| Smooth Breath + Grave | = (equal sign) + vowel | ἂ ἒ ὂ |
| Smooth Breath + Circumflex | - (dash) + vowel | ἆ ἶ ὖ |
| Rough Breath | " (quote) + vowel | ἁ ἑ ὁ |
| Rough Breath + Acute | ? (question mark) + vowel | ἅ ἔ ὅ |
| Rough Breath + Grave | + (plus sign) + vowel | ἃ ἓ ὃ |
| Rough Breath + Circumflex | _ (underscore) + vowel | ἇ ἷ ὗ |
| Rough Breath + Rho | " (quote) + r | ῥ |
An iota subscript is an iota written under either α, η, or ω, and helps to identify the function of the word, often signalling the dative case. The iota subscript is not pronounced, but simply helps to identify the word's function. When a Greek word with an iota subscript is written in capitals, the iota is promoted to the main line, following its vowel.
| Type This Key Combination | Examples | |
|---|---|---|
| Iota Subscript | { (left brace) + vowel | ᾳ ῃ ῳ |
| Iota Subscript + acute | ; (semicolon) + { (left brace) + vowel | ᾴ ῄ ῴ |
| Iota Subscript + grave | ] (right bracket) + { (left brace) + vowel | ᾲ ῂ ῲ |
| Iota Subscript + circumflex | [ (left bracket) + { (left brace) + vowel | ᾷ ῇ ῷ |
| Iota Subscript + Smooth Breath | ' (apostrophe) + { (left brace) + vowel | ᾀ ᾐ ᾠ |
| Iota Subscript + Smooth Breath + acute | / (slash) + { (left brace) + vowel | ᾄ ᾔ ᾤ |
| Iota Subscript + Smooth Breath + grave | = (equal sign) + { (left brace) + vowel | ᾂ ᾒ ᾢ |
| Iota Subscript + Smooth Breath + circumflex | - (dash) + { (left brace) + vowel | ᾆ ᾖ ᾦ |
| Iota Subscript + Rough Breath | " (quote) + { (left brace) + vowel | ᾁ ᾑ ᾡ |
| Iota Subscript + Rough Breath + acute | ? (question mark) + { (left brace) + vowel | ᾅ ᾕ ᾥ |
| Iota Subscript + Rough Breath + grave | + (plus sign) + { (left brace) + vowel | ᾃ ᾓ ᾣ |
| Iota Subscript + Rough Breath + circumflex | _ (underscore) + { (left brace) + vowel | ᾇ ᾗ ᾧ |
- Open the System Preferences Panel by clicking on the Apple Menu in the upper-left-hand corner of your screen.
- Select System Settings.
- Scroll down through the settings option and click the Keyboard menu option.
- Scroll through all the keyboard options until you come to Text Input.
- Under the Input Sources setting, click the Edit... button.
- In the lower-left-hand corner of the panel, click the + button to add a language keyboard.
- In the list of languages presented, scroll down until you see Japanese in the left-hand menu panel and click on the English option.
- In the right-hand menu panel, select the Japanese - Kana option.

- Click the Add button.
- Once you have selected your keyboard layout preference, you will see a long list of options in the right-hand pane.
Hiragana will be selected by default as an input mode. Select Katakana as well, and if you need to enter in spaced Roman letters alongside Hiragana or Katakana, select Full-Width Romaji as well.
You can select how you want the Caps Lock key to function, for example as a quick and convenient way to switch between English letters and Hiragana/Katakana.
Continuing down to the next set of options:
Live Conversion automatically converts hiragana characters into relevant Japanese text, including kanji, as you type. This eliminates the need to press the Space bar for individual word conversions. if you uncheck Live Converrsion, you will be using traditional conversion, wherre you type the text in hiragana, then convert it to kanji.
Correct spelling will automatically correct Japanese spelling errors or suggest candidates as you type.
Predictive candidates will have the Candidate window predict the most likely candidates for completing text as you type, based on what you previously typed and selected.
Romaji Layout allows you to set the keyboard layout to use for the Romaji typing method (QWERTY, AZERTY, Russian, English, etc). By default, the typing method uses the most recent keyboard layout you used; if you want to always use a specific layout, set it here.
If you use a JIS keyboard, set whether you enter a slash (/) or a middle dot (・) when you press the Slash key.
If you use a JIS keyboard, set whether you enter a backslash (\) or a Yen sign (¥) when you press the Yen key. - Go ahead and close the System Setting panels once you have selected your language keyboard.
- In the upper-right-hand portion of your screen, you will see that some language selection options have appeared. Click on the Text Input menu option to select the Hiragana or Katakana keyboard.

- Your text input option should have turned to an [あ] icon for Hiragana or an [ア] icon for Katakana. You now have the Japanese Hiragana or Katakana enabled and can begin typing Japanese.
Using the Romaji Input Mode
For this input mode, you will want to select the Japanese - Romaji input source and then select Hiragana, or if you are using both input sources, select Hiragana - Romaji.
The Romaji typing method is useful when you’re not using a Japanese keyboard; text you type is automatically converted to hiragana.
You use a regular U. S. keyboard and type out hiragana or katakana phonetically
For example, to type こんにちわ, you would type K O N N I C H I W A. As you type, the roman letters will be automatically converted to hiragana, so that K O become こ in the candidate window, N N become ん, I C H I becomes 日 (then you scroll down to find にち in the candidate window), and then finally W A becomes わ.
Another example would be ようこそ, where you type Y O O K O S O and the candidate window will present you with various cominations of hiragana and/or katakana and/or kanji until you find the correct candiate combination.
Using the Kana Input Mode
Typing in Kana will be like typing on a Japanese native keyboard or on a computer used in Japan.
Hiragana Layout
For this input mode, you will want to select the Hiragana input source.

Katakana Layout
For this input mode, you will want to select the Katakana input source.

- Open the System Preferences Panel by clicking on the Apple Menu in the upper-left-hand corner of your screen.
- Select System Settings.
- Scroll down through the settings option and click the Keyboard menu option.
- Scroll through all the keyboard options until you come to Text Input.
- Under the Input Sources setting, click the Edit... button.
- In the lower-left-hand corner of the panel, click the + button to add a language keyboard.
- In the list of languages presented, scroll down until you see Korean in the left-hand menu panel and click on the English option.
- In the right-hand menu panel, select the 2-Set Korean option.

- Click the Add button.
- Once you have selected your keyboard layout preference, you will see a list of options in the right-hand pane. In this window, you can customized how big you want your Korean input to be, how to handle Hanja (Chinese characters in Korean contexts, etc.

- Go ahead and close the System Setting panels once you have selected your language keyboard.
- In the upper-right-hand portion of your screen, you will see that some language selection options have appeared. Click on the Text Input menu option to select the 2-Set Korean keyboard.

- Your text input option should have turned to an [한] icon. You now have the Korean keyboard enabled and can begin typing Korean.
Note: for detailed explanations of each option, click the Help submenu item and an Apple Help window will appear to give you assistance.
In an app on your Mac, do any of the following to choose one of the Korean input sources.
Use the Input menu: Click the Input menu in the menu bar, then choose a Korean input source. If an input source is dimmed, the current app doesn’t support it.
You can also press Option-Control-Space bar to select the next input source in the Input menu, or Control-Space bar to select the previous input source.
Use the Caps Lock key: If you set an option in Input Sources preferences to use the Caps Lock key to change input sources, press the key to switch between a non-Latin input source (such as Korean) and a Latin input source (such as English).
Typing in Korean
The Korean 2-set keyboard layout is designed so that consonants will be on the left side of the keyboard and vowels will be on the right side.

If you type Hangul in a search field, the results show possible matches for you to choose from, even if you enter just one character.
You can use the Keyboard Viewer to see which keys correspond to the Korean input source you’re using. To see the Keyboard Viewer, click the Input menu, then choose Show Keyboard Viewer.
If your Mac has a Touch Bar, it can show words or phrases you might want to use next (called typing suggestions), to help you save time.
- Open the System Preferences Panel by clicking on the Apple Menu in the upper-left-hand corner of your screen.
- Select System Settings.
- Scroll down through the settings option and click the Keyboard menu option.
- Scroll through all the keyboard options until you come to Text Input.
- Under the Input Sources setting, click the Edit... button.
- In the lower-left-hand corner of the panel, click the + button to add a language keyboard.
- In the list of languages presented, scroll down until you see Russian in the left-hand menu panel and click on the English option.
- In the right-hand menu panel, select the Russian - QWERTY or the Russian - PC option.

- Click the Add button.
- Go ahead and close the System Setting panels once you have selected your language keyboard.
- In the upper-right-hand portion of your screen, you will see that some language selection options have appeared. Click on the Text Input menu option to select a Russian keyboard.

- Your text input option should have turned to an [Ру] icon. You now have a Russian keyboard enabled and can begin typing in Cyrillic.
Using the Russian Keyboard
QWERTY Layout
The basic layout of the Russian-QWERTY keyboard maps most of the Cyrillic letters phonetically to their U. S. letter counterparts.

By pressing the Option key or Shift-Option key combination, more Cyrillic characters and other useful characters become available.

PC Layout
The basic layout of the Russian-PC keyboard maps most of the Cyrillic letters as you would find on a computer in the Russian Federation or in most of the Russian speaking world.
By pressing the Option key or Shift-Option key combination, more Cyrillic characters and other useful characters become available.

Contact the ILRC
Interactive Language Resource Center
Irvin Hall 60
400 East Spring Street
Oxford, OH 45056-3645
United States
(513) 529-4505
ilrc@MiamiOH.edu
Daniel E. Meyers, M.A., Director
Irvin Hall 47
(513) 529-2510
meyersde@MiamiOH.edu